|
| Aquarium filters |
 |
 |
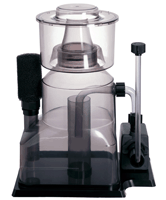
| In Sump Skimmer™ |
- Adjustable venturi with air/water mixing chamber
- Large volume
- Adjustable collection cup
- Replaceable filter sponge
- For aquarium up to 250 gallon
- Compact and efficient design
- Simple installation and user friendly
- Complete skimmer for saltwater and reef aquariums
|
|
|
- Specifications
- Models
- Part List
- Installation
- Maintenance
| An In-Sump Skimmer that comes ready to run out of the box. It features a large intake venturi, positive water level control, air control valve and a large base to remove micro bubbles. This skimmer is second to none. Priced to be affordable with the ability to make retail keystone margins. Simple to install and set up. User friendly for both employee and consumer. |
| |
Item No. |
Dimension |
Wattage |
Capacity
|
UPC No. |
 |
SK 200 |
13” x 8.5” x 15.5”
|
35 watt |
up to 150 gal. |
006903728249 |
 |
SK 388 |
14.5” x 9” x 17.5”
|
45 watt |
up to 250 gal. |
006903715218 |
|
- Discharge sponge
- Variable discharge tube
- Discharge compression nut
- Main body
- Base
- Collection cup lid
- Collection cup
- Intake compression nut
- Air control valve
- 90-degree clear pump discharge tube
- Venturi intake tube
- Treaded pump adapter
- Venturi tube adapter
- Pump
|
- Remove the collection cup and wash well with a mild detergent and rinse with hot water. Ensure all the detergent is removed from the collection cup.
- Fill the skimmer half way with salt water and place in the sump:
a. Place so that the discharge of the skimmer is the farthest from the return pump.
b.
Sumps minimum water level is 5.5” and maximum water level is 9”.
- Plug the pump into a GFCI electrical outlet.
- Place the collection cup on the skimmer.
- Open the Air Regulator 75% and adjust the variable discharge to ¾” form the bottom of the collection cup.
- Before doing any other adjustments to the skimmer let operate for a minimum of 1 hour.
- Now, the skimmer will either do the skimming properly, collecting water and no protein, or not skimming/collecting any protein. If the skimmer is not working properly, download the following instructions depending on the specific situation.
Note: The skimmer will not work without a biological load.
If you have problem opening PDF file from Internet Explorer,
please try Firefox or right click on the link and select Save Target As and save the PDF file in your computer. |
MAIN BODY
- Disconnect the pump from the electrical outlet.
- Remove the skimmer from the sump.
- Remove all the water from the skimmer body.
- Remove the pump from the skimmer body. This is done by loosening both nuts and removing the 90-degree clear pump discharge tube. After slide pump from the base.
- Fill unit with water and add a small amount of bleach. Approximate a capful.
- Let stand for 1 hour.
- Rinse unit well and refill with fresh water.
- Add a water conditioner that removes chlorine to the water and let stand for 1 hour.
- Rinse well, reassemble, and install.
WATER PUMP AND VENTURI
- Disconnect the pump from the electrical outlet.
- Remove the skimmer from the sump.
- Remove all the water from the skimmer body.
- Remove the venturi tube and air control valve and run water through the unit so that water runs through air control valve.
- Remove the impeller well cover, impeller and shaft. Clean well. A small amount of vinegar should be used to clean the ceramic shaft.
- With a small brush clean the inside of the impeller well.
- Reassemble and install back into the sump.
DISCHARGE SPONGE
If sponge clogs, the water level in the skimmer will increase causing the skimmer to collect foam/water in the collection cup. Clean twice a month and replace when needed.
COLLECTION CUP
Clean as needed. Keeping the collection cup clean insures a properly operating skimmer. |
|
| |
|
|
|
